Ok, I am not in a pyramid marketing scheme convincing you to buy 6 ketchups from my stockpile but I am kinda planning for the Apocalypse. You are going to need to ration your mango chutney when you begin hiding in the shadows from flesh eating zombies, and the word 'Trader Joes' is just a vague memory from a world you once knew.
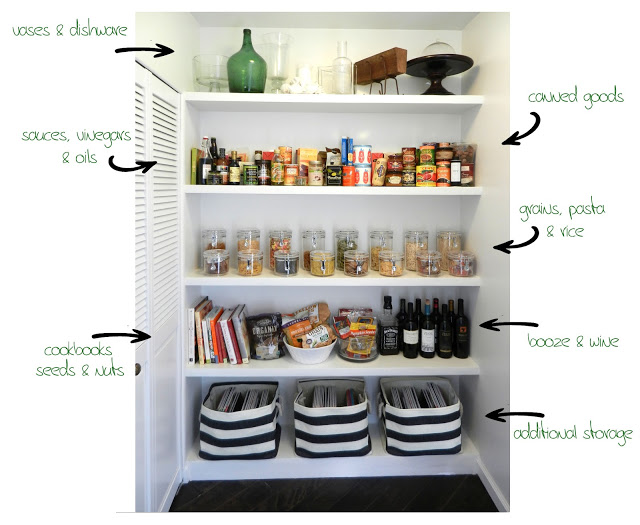
So I'm gonna pimp my pantry and stay organized, so actually take inventory of my nut varieties.
Why should your food storage be a dark closet where quick cooking oatmeal goes to die?
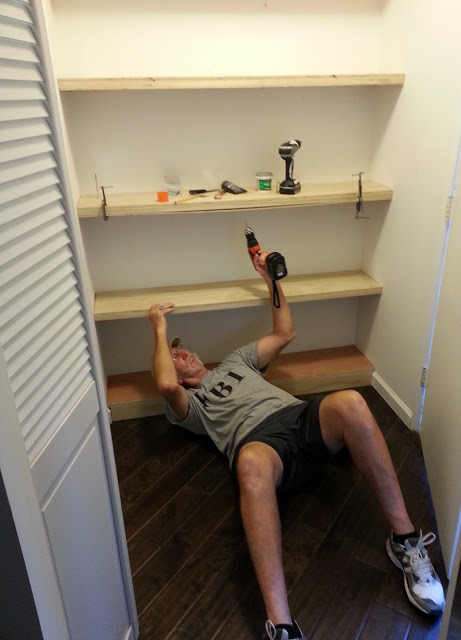
I have a laundry/utility room off my kitchen with a 12” deep wall niche. I’ve been staring at those 12” since 2008, fantasizing about the weekend I would DIY the shiz out of this niche with floating shelves. Well that day arrived and since Smooch and I are DIY rookies, we enlisted my dad, Old Stash. Our shelves are 56” Long x 12” Deep, so the quantity of screws and materials depends on the size of your shelf.
MATERIAL LIST:
- ¾” Plywood Sheets cut to the size of your niche
- ¼” Wood Sheets, can be veneer, mdf or whatever is cheap because it’s going on the underside of the shelf and just needs to be paintable wood. Cut to the size of the niche.
- ¾” square solid wood moldings (these will act as the ‘invisible’ brackets that will hold the weight of your shelf, they will be referred to as our “ledgers”)
- 7 x 3” screws per shelf
- 12 x 1 ½” screws per shelf
- 20 x 3/8” screws per shelf
- Dap’s Crack Shot – High Performance Spackling Paste
- Varathane’s Polyurethane Gloss
- Dap’s Paintable Wood Caulking
- Sandpaper
- 80 Grit to smooth down the spackle chunks
- 220 Grit to prepare for painting and sand in between coats of polyurethane lacquer
- 400 Grit to finish off the fascia, post painting
- Stud finder
- Level (Old Stash’s laser level was a great help)
1. MEASURE AND MARK YOUR WALL - First you’ll need to decide the spacing between your shelves; this will come down to personal preference. I made ours 15” high which is the max you should go, I did this to give our shelves a nice roomy and open-feeling. I also left our top shelf at 18” high, to allow for even taller items like vases or equipment like blenders, etc.
Your shelf will be 1 ¾” in height, and your ledgers will need to be attached to the wall ¾” below where you want the top of your shelf to sit.
Begin from your bottom shelf and work up, measuring the height for your preferred spacing of each shelf. Using a level and stud finder, basically draw your shelves along the wall with a pencil. After finding the studs, mark your screw holes for each shelf.

2. ATTACH LEDGERS - Cut the ¾” ledgers to size and pre-drill them to make sure the 3”screws don’t split the wood. Using the 3” screws, attach the ledgers to the wall based on your penciled markings . Since these will hold the weight of your shelves, when possible, these screws should be drilled directly into the studs. (If studs cannot be found, the use of drywall anchors is highly suggested.)

3. INSTALL THE SHELF - First secure the remaining wood ledger to the front of your plywood shelf. Make sure it’s as flush as possible; this will be the face of your shelf. Place the shelf on top of your wall bracket. Using the 1 ½” screws, attach the shelf to the ledgers. For a smoother finish, you can counter sink the flat-head screws into the top of your shelf. For our shelf size, we used 4 screws along the back and front, and 2 on the sides.
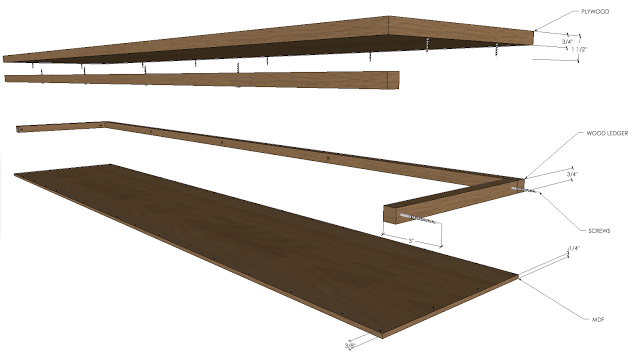
4. ATTACH THE SHELF BASE - Old Stash attached the ¼” mdf sheet to the underside, by drilling 3/8” screws approximately 5” – 8” apart. Use a clamp or two to hold the sheet in place while drilling.
5. PREP FOR PAINTING - After some trial and error, we found that wood filler is dry and crumbly. Since we are painting (not staining) we used a heavy duty spackle to fill the screw holes, to fill any large gaps along the walls that were too wide for caulk, and to create a smooth front fascia.
Layering the spackle on the front of your shelves will take a number of repetitions. Spackle – let dry – sand. Tutorials I found say you only need to do this 2-3 times, but since we are amateurs, we did this 5-6 times. Continue this process until you are satisfied with the smoothness of your shelf face. Lastly, using the caulk, fill in the edges along the back and sides of each shelf, smooth away excess by wiping with your finger. Yes, I said wipe with your finger.
6. PAINTING AND FINISHING - Now prime and paint the wall and your shelves. I always use minimum 3 coats of paint to get the depth I want. I applied 4 coats of polyurethane gloss finish, with a minimum of 2 hours dry time, between coats. I did 2 coats Saturday and 2 coats Sunday. This is why it literally takes an entire weekend or two or three, depending on your patience.
7. A NOTE ON YOUR BOTTOM SHELF – This will be a bit different for everyone. We were able to rest our bottom shelf directly onto the base molding, and used scrap plywood as a toe-kick to hold up the front of the shelf. Smooch artfully filled the corners and gaps with spackle. After sanding and painting it turned out great. BUT, for your bottom shelf, you may need to use the ledgers as above.
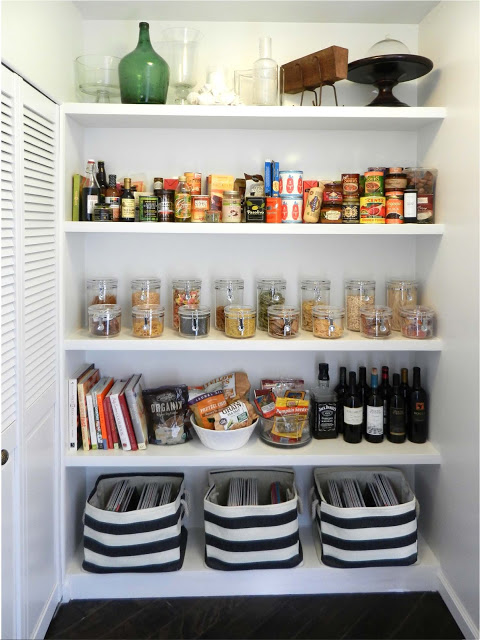
Remember to save the scrap plywood for your toe-kick. Find containers that you like, make sure they fit the depth of your shelves. Acrylic Airtight Jars Striped Baskets